DNS (Domain Name Service) plays a critical role in the operation of all web browsers. When you type in a domain, such as Tweaks.com, your browser must resolve the address into an IP address so your computer can talk to the site's server and download the web page. Once the page is downloaded, it is processed by the browser, which then can trigger hundreds of downloads as the various resources on the page are fetched. Many of these requests for resources go to different domains which also must be resolved before the browser can download the file. The result is a lot of domain resolutions, which makes the performance of your DNS provider critical to your web browsing speed.
In the past, I have written about how you can speed up your browser simply by changing your DNS servers to OpenDNS, an alternative to the DNS servers provided by your internet service provider. I also covered how to manually test the performance of a DNS provider to make sure you select the best one that gives you the best performance. Now there is an even better solution using a free utility called NameBench developed by Google to automatically test the performance of all of the popular DNS providers for your location. Once you run the utility, a report will be generated with a personalized DNS provider recommendation.
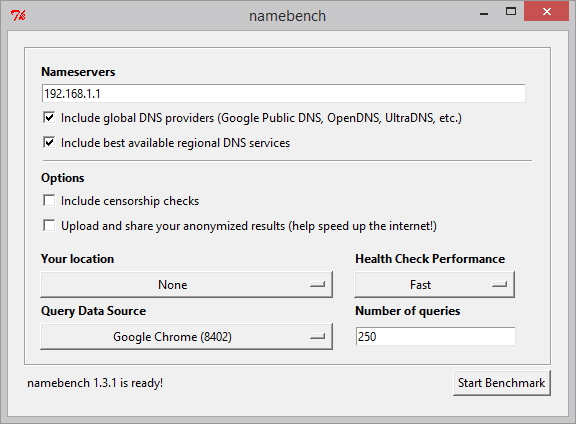
To get started, head over to https://code.google.com/p/namebench/downloads/list and download the latest version for your platform. Then, run the downloaded EXE and hit the Extract button. The utility will start up automatically.

Adjust the Query Data Source to a good sample set for your usage and click Start Benchmark and after a few minutes a the report will generate and open in your browser.
Tip 1: You may want to adjust the number of queries to speed up the benchmark results.
Tip 2: This utility was created before Cloudflare entered the free public DNS market. As such, it does not include 1.1.1.1 as part of the list of global DNS providers. But you can still test the performance of Cloudflare DNS by simply entering 1.1.1.1 in the nameservers box.

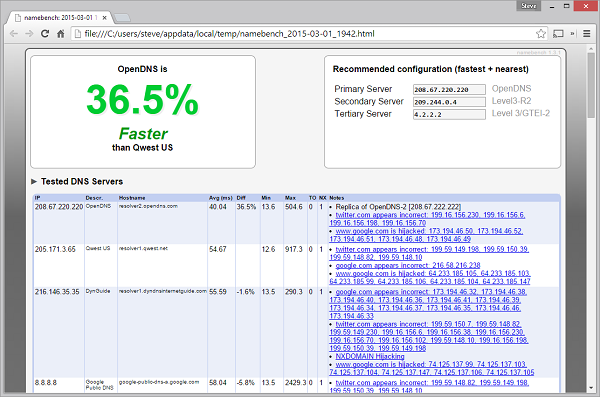
In my case, OpenDNS was 36.5% faster than my current DNS provider. The report also provides the IP addresses of the DNS providers the benchmark shows had the best performance in the top right.
Now that you know what DNS servers to use, setting the DNS server for your PC is very simple.
- Click on the Start Button and type in ncpa.cpl and hit Enter.
- Right click on your active network connection and select Properties.
- On the Networking tab, select Internet Protocol version 4 (TCP/IP) and hit Properties.
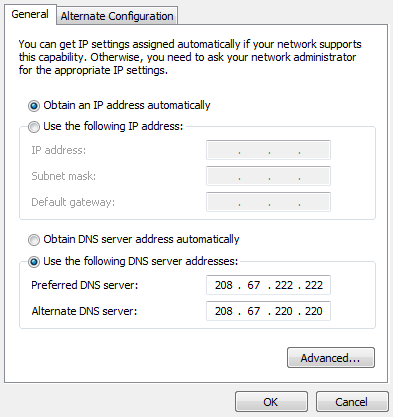
- On the properties screen, select Use the following DNS server addresses and then type in IP addresses recommend in the Namebench report in the preferred and alternate DNS server boxes.

