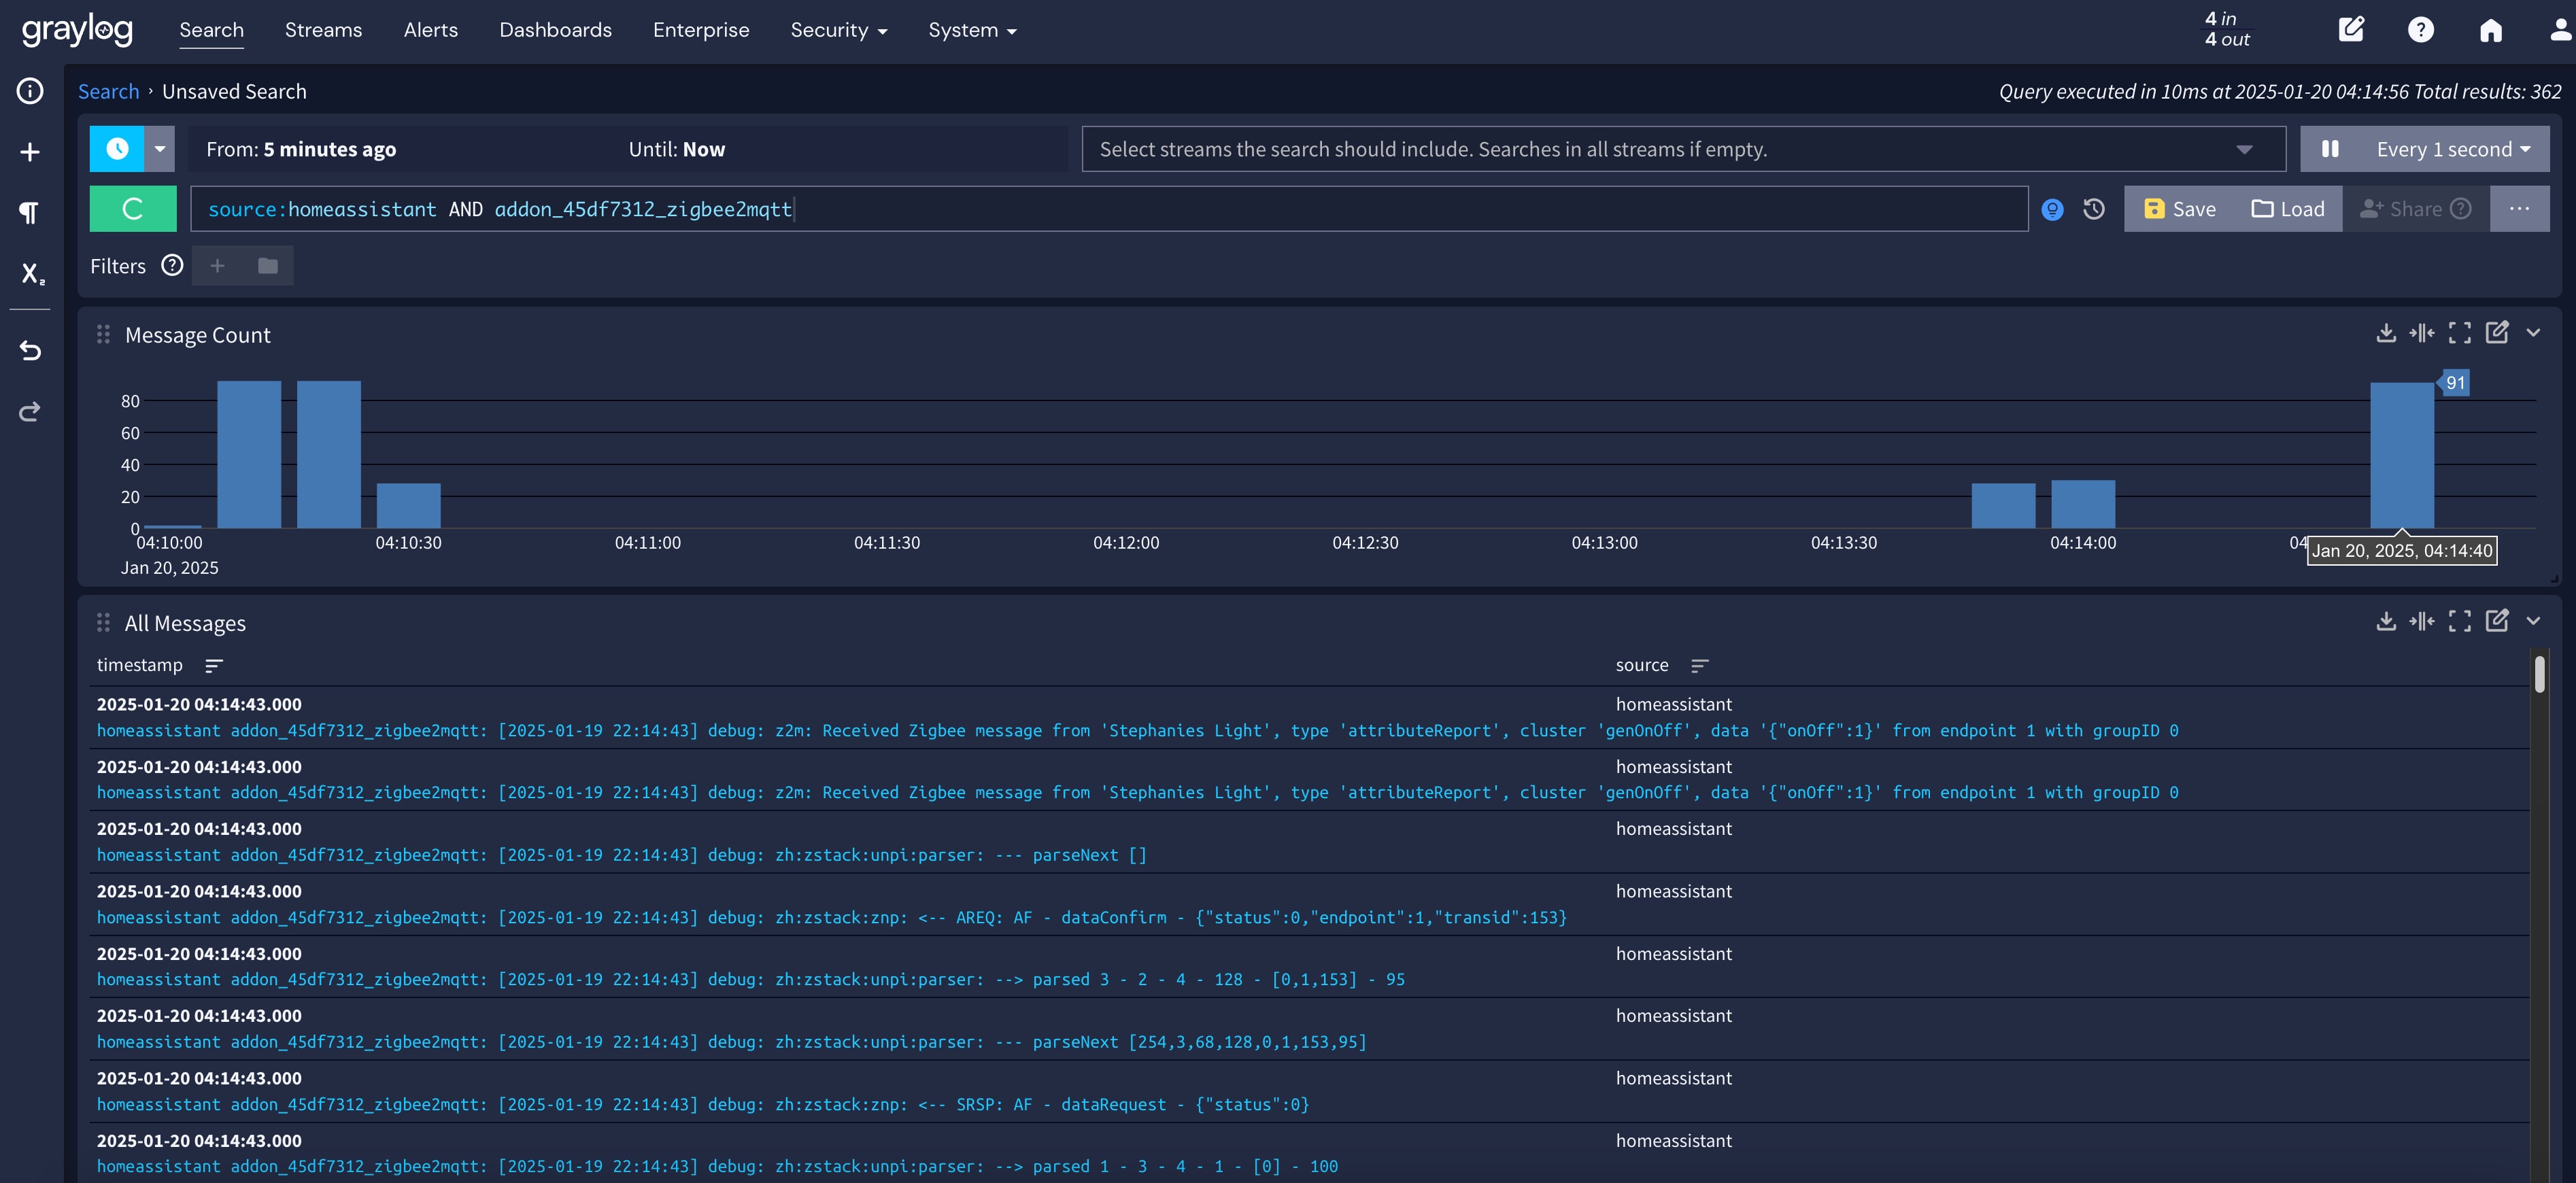
Graylog is an open source log management platform that will collect, store, and index your logs to provide centralized monitoring and alerting for your applications and infrastructure. While there are "enterprise" editions available for purchase, the free open source edition provides the core capabilities with no log ingestion limits.
I moved to Graylog after using Splunk in my home lab for several years. While Splunk is a great tool, I was forced to move because a device on my network suddenly started sending hundreds of logs per second which pushed me past the 500 MB daily log ingestion limit of the free version of Splunk. If you exceed the limit for more than 10 days Splunk will essentially shut down and you can't even search. So when I went to troubleshoot what was going on with the device gone wild, Splunk held my logs hostage unless I upgraded to an enterprise license.
After much research and going back and forth between ELK stack and Graylog, I settled on Graylog as it was simpler for my use case of simply centralizing my logs via syslog. In addition, it had many features that were locked behind the enterprise edition of Splunk (alerting) which would be helpful in the future.
Best of all, Graylog is available in a easy to setup Docker Compose file that will have you running Graylog on an existing Docker host in a matter of minutes.
Prerequisites
For this guide I'm going to assume you have a linux box with Docker and Docker Compose setup and installed. I also recommend setting up Watchtower to keep all your base container images updated.
Download & Configure the Docker Compose Files
To begin, navigate to a directory you want to store the Docker Compose and an environment file, and create a directory called graylog-docker.
mkdir graylog-docker
cd graylog-docker
Next, let's download the official docker-compose.yml for the "open-core" edition of Graylog along with the .env file from the github repo.
The Docker Compose file will automatically download and configure three images for the required components: mongodb (config data), graylog-datanode (log data & indexing), and the core graylog server.
Run the following commands to download the required files:
wget https://raw.githubusercontent.com/Graylog2/docker-compose/refs/heads/main/open-core/docker-compose.yml
wget https://raw.githubusercontent.com/Graylog2/docker-compose/refs/heads/main/open-core/.env.example
The Docker Compose file we downloaded uses variables (stored in the .env file) for important setting values (password & pepper) so the file does not typically need to be modified unless you would like to change the Docker port mappings.
# For DataNode setup, graylog starts with a preflight UI, this is a change from just using OpenSearch/Elasticsearch.
# Please take a look at the README at the top of this repo or the regular docs for more info.

services:
  mongodb:
    image: "mongo:5.0"
    volumes:
      - "mongodb_data:/data/db"
    restart: "on-failure"

  # For DataNode setup, graylog starts with a preflight UI, this is a change from just using OpenSearch/Elasticsearch.
  # Please take a look at the README at the top of this repo or the regular docs for more info.
  datanode:
    image: "${DATANODE_IMAGE:-graylog/graylog-datanode:6.1}"
    hostname: "datanode"
    environment:
      GRAYLOG_DATANODE_NODE_ID_FILE: "/var/lib/graylog-datanode/node-id"
      GRAYLOG_DATANODE_PASSWORD_SECRET: "${GRAYLOG_PASSWORD_SECRET:?Please configure GRAYLOG_PASSWORD_SECRET in the .env file}"
      GRAYLOG_DATANODE_ROOT_PASSWORD_SHA2: "${GRAYLOG_ROOT_PASSWORD_SHA2:?Please configure GRAYLOG_ROOT_PASSWORD_SHA2 in the .env file}"
      GRAYLOG_DATANODE_MONGODB_URI: "mongodb://mongodb:27017/graylog"
    ulimits:
      memlock:
        hard: -1
        soft: -1
      nofile:
        soft: 65536
        hard: 65536
    ports:
      - "8999:8999/tcp"   # DataNode API
      - "9200:9200/tcp"
      - "9300:9300/tcp"
    volumes:
      - "graylog-datanode:/var/lib/graylog-datanode"
    restart: "on-failure"

  graylog:
    hostname: "server"
    image: "${GRAYLOG_IMAGE:-graylog/graylog:6.1}"
    depends_on:
      mongodb:
        condition: "service_started"
    entrypoint: "/usr/bin/tini --  /docker-entrypoint.sh"
    environment:
      GRAYLOG_NODE_ID_FILE: "/usr/share/graylog/data/data/node-id"
      GRAYLOG_PASSWORD_SECRET: "${GRAYLOG_PASSWORD_SECRET:?Please configure GRAYLOG_PASSWORD_SECRET in the .env file}"
      GRAYLOG_ROOT_PASSWORD_SHA2: "${GRAYLOG_ROOT_PASSWORD_SHA2:?Please configure GRAYLOG_ROOT_PASSWORD_SHA2 in the .env file}"
      GRAYLOG_HTTP_BIND_ADDRESS: "0.0.0.0:9000"
      GRAYLOG_HTTP_EXTERNAL_URI: "http://localhost:9000/"
      GRAYLOG_MONGODB_URI: "mongodb://mongodb:27017/graylog"
    ports:
    - "5044:5044/tcp"   # Beats
    - "5140:5140/udp"   # Syslog
    - "5140:5140/tcp"   # Syslog
    - "5555:5555/tcp"   # RAW TCP
    - "5555:5555/udp"   # RAW UDP
    - "9000:9000/tcp"   # Server API
    - "12201:12201/tcp" # GELF TCP
    - "12201:12201/udp" # GELF UDP
    #- "10000:10000/tcp" # Custom TCP port
    #- "10000:10000/udp" # Custom UDP port
    - "13301:13301/tcp" # Forwarder data
    - "13302:13302/tcp" # Forwarder config
    volumes:
      - "graylog_data:/usr/share/graylog/data/data"
      - "graylog_journal:/usr/share/graylog/data/journal"
    restart: "on-failure"

volumes:
  mongodb_data:
  graylog-datanode:
  graylog_data:
  graylog_journal:
There are two settings that we must update in the Graylog .env file before we can bring up the Docker Compose file. But first we must rename the file we downloaded .env.example to the proper name so the Docker Compose engine will inject it into the process.
To rename, just run:
mv .env.example .env
Keep in mind files that start with a period are hidden files on Linux systems, so to view it you will need to list with the -a option such as ls -a.
Let's view the contents of the .env file by running cat .env
# You MUST set a secret to secure/pepper the stored user passwords here. Use at least 64 characters.
# Generate one by using for example: pwgen -N 1 -s 96
# ATTENTION: This value must be the same on all Graylog nodes in the cluster.
# Changing this value after installation will render all user sessions and encrypted values in the database invalid. (e.g. encrypted access tokens)
GRAYLOG_PASSWORD_SECRET=""

# You MUST specify a hash password for the root user (which you only need to initially set up the
# system and in case you lose connectivity to your authentication backend)
# This password cannot be changed using the API or via the web interface. If you need to change it,
# modify it in this file.
# Create one by using for example: echo -n yourpassword | shasum -a 256
# and put the resulting hash value into the following line
# CHANGE THIS!
GRAYLOG_ROOT_PASSWORD_SHA2=""
As you can see, there are just two settings we need to configure. The first GRAYLOG_PASSWORD_SECRET, is added to password hashes as an extra layer of protection and can be any random set of characters and numbers or even a sentence if you want. Just follow the recommendation of a total length of at least 64 characters. I like to make up a random sentence here.
The second setting, GRAYLOG_ROOT_PASSWORD_SHA2, will be the hash of the admin password you will use to log into the Graylog web interface everyday, after the initial setup (a different password will be used for that - more on that later).
This password value is a hash, so you need to generate the hash by running a command with the password you want to use. The example in the .env file works great for this. Just run echo -n password_you_want_to_use | shasum -a 256 and the hash will be displayed on the screen. You can then copy and paste this into the file in the quotes. I don't always have the luxury of using a terminal with copy and paste capabilities (such as the console of the docker server) so I like to do this to dump this hash at the end of the .env file that is easy to clean up and put in quotes with the nano text editor.
echo -n YourPassword | shasum -a 256 >> .env
No matter what technique you want to use, you can edit the file by simply running nano .env and make your changes.
Then using your keyboard, hit CTRL & O to write out to the file. and CTRL & X to exit the editor.
CTRL + O
CTRL + X
At this point run cat .env to make sure the file is properly configured and in the right syntax with double quotes around the values we edited.
Run Docker Compose File
We are now ready to kick off setup with Docker Compose. Simply run the following at your terminal:
docker compose up -d
Note, the -d parameter at the end installs the Graylog components as daemons so they run in the background.
First Run Initial Setup
Once all three images have been downloaded, configured, and are running, fire up your browser and go to: http://<Docker Host IP>:9000
You will be prompted to log in but you will need to use a special initial configuration password. The user is admin but the password can only be found by looking at the docker container logs for the graylog core container. To do that, run the following:
docker compose logs graylog | more
Hit the down arrow to page through the logs until you see this section:
^[[2Kgraylog-1  |                                                              ---
^[[2Kgraylog-1  |                                                              ---
^[[2Kgraylog-1  |                                                              ---
^[[2Kgraylog-1  |     ########  ###   ######### ##########   ####         #### ---         .----               ----
^[[2Kgraylog-1  |   ###############   ###################### #####       ####  ---      ------------       .----------- --
^[[2Kgraylog-1  |  #####     ######   #####              #### ####      ####   ---     ---        ---     ---        -----
^[[2Kgraylog-1  | ####         ####   ####       ############  ####     ####   ---    --           ---   ---           ---
^[[2Kgraylog-1  | ###           ###   ####     ##############   ####   ####    ---   ---            --   --             --
^[[2Kgraylog-1  | ####         ####   ####    ####       ####    #### ####     ---   ---            --   --            .--
^[[2Kgraylog-1  | #####       #####   ####    ####       ####     #######      ---    ---          ---   ---           ---
^[[2Kgraylog-1  |  ################   ####     ##############     ######-       --     ----      ----      ---       -----
^[[2Kgraylog-1  |    ##############   ####      #############      #####        -----   -----------         ----------  --
^[[2Kgraylog-1  |              ####                                ####                                                ---
^[[2Kgraylog-1  | #####       ####                                ####                                     -          .--
^[[2Kgraylog-1  |   #############                                ####                                     -----     ----
^[[2Kgraylog-1  |      ######                                   ####                                          -------
^[[2Kgraylog-1  |
^[[2Kgraylog-1  | ========================================================================================================
^[[2Kgraylog-1  |
^[[2Kgraylog-1  | It seems you are starting Graylog for the first time. To set up a fresh install, a setup interface has
^[[2Kgraylog-1  | been started. You must log in to it to perform the initial configuration and continue.
^[[2Kgraylog-1  |
^[[2Kgraylog-1  | Initial configuration is accessible at 0.0.0.0:9000, with username 'admin' and password 'umEGHRrWWP'.
^[[2Kgraylog-1  | Try clicking on http://admin:[email protected]:9000
^[[2Kgraylog-1  |
^[[2Kgraylog-1  | ========================================================================================================
^[[2Kgraylog-1  |
In this case, the special initial configuration web interface password is umEGHRrWWp but this will absolutely be different for you.
Log into the initial configuration interface with the username admin and the password you view above in your logs. Follow the guided setup and when complete you will be presented with the normal login interface.
Setup a UDP Syslog Input
Now that Graylog is fully configured, you can log into the web interface using the admin id with the password you setup with your hash generation and stored in the .env file.
Once you are logged in, on the top menu, click System and select Inputs.
On the Inputs screen, in the Select input drop down list, select Syslog UDP and click the Launch new input button.

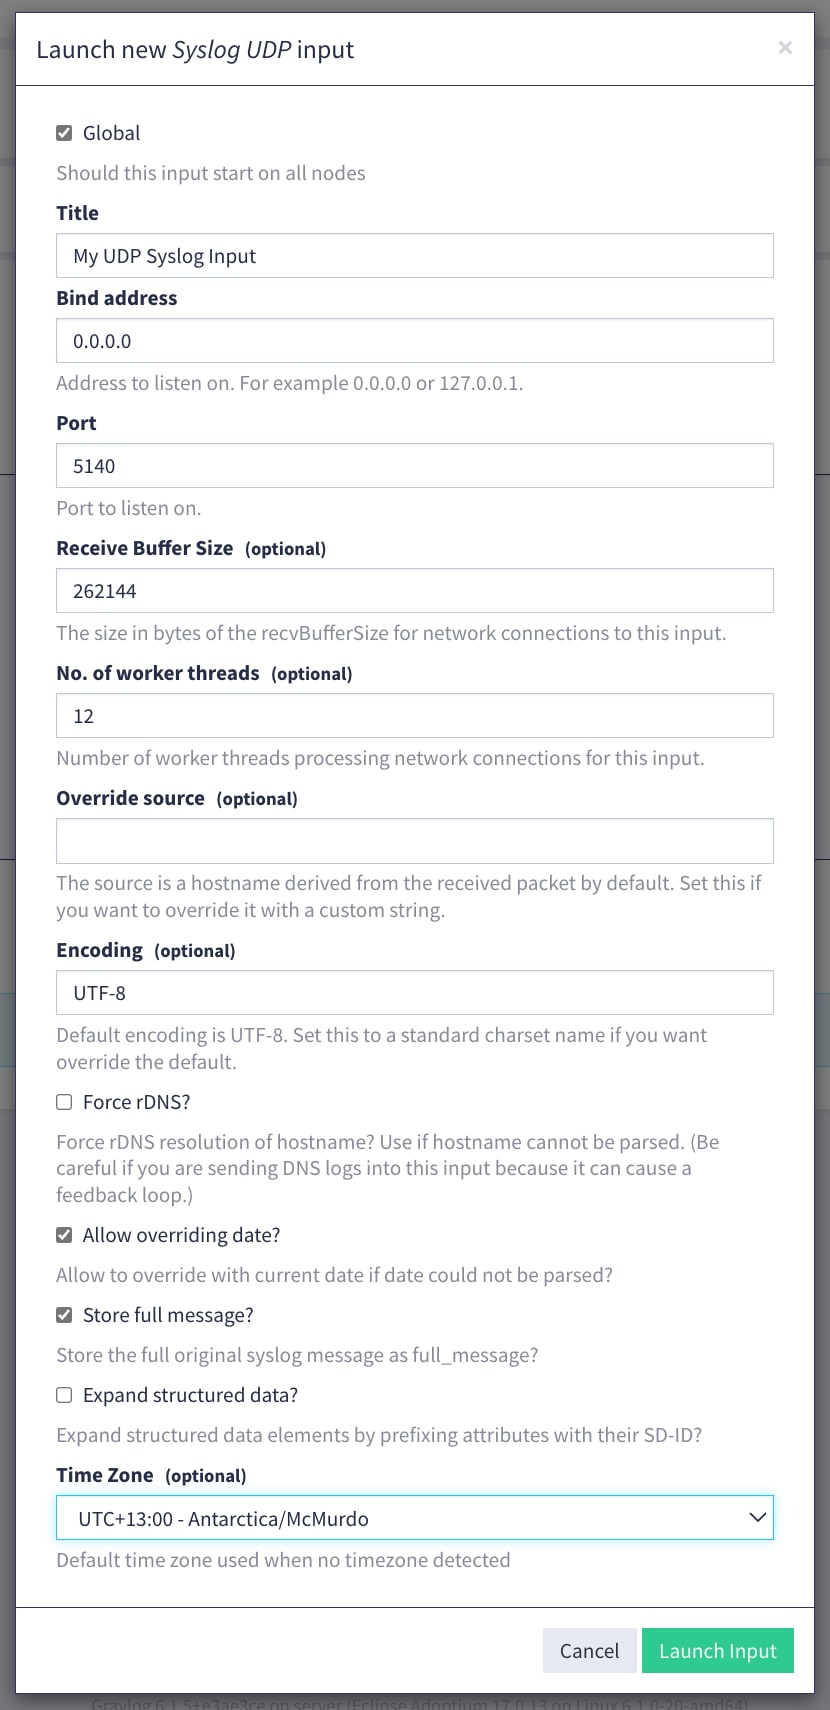
On the Launch new Syslog UDP Input screen, check the Global option box. Enter in a Title, and change the port from 514 to 5140 (to match the Docker Compose file port mapping from earlier). Finally, check the box to store the full message and set your default Time Zone. It is very important to set the Time Zone, otherwise somme messages may be missing from search later!

Hit the Launch Input button and your Graylog setup is ready to receive UDP syslog input.
Point your devices to your new "syslog server," which will be your Docker host IP on port 5140 (for example 192.168.1.25:5140) and you should start to see Throughput / Metrics indicating messages have been received on your input. Simply hit the Show received messages button to see the details coming in.

Congrats, your Graylog instance is now fully configured and actively collecting logs sent to it. Hit Search in the top menu and begin searching!
