
Disable all Ads in Windows 10 Creators Update

Posted March 2017 by Steve Sinchak

The Windows 10 "Creators" update (spring 2017) delivers a number of advancements and new benefits, but many believe the amount of ads are starting to get out of control. I previously wrote about how to disable Start Menu ads in earlier versions of Windows 10, but with the Creators Update you may notice ads on the lock screen, app tiles, action center, and even in file explorer. If you have had enough of these "suggestive" ads, then this article is for you. I'm going to show you how to quickly disable these ads for good.

Part 1:  Disable Lock Screen Ads

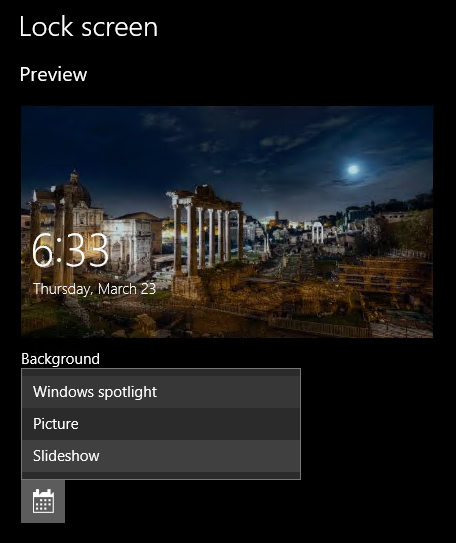
Click on the Start Button and type in Lock Screen Settings and then hit Enter when it shows up in the search results.

Lock Screen Settings

Change the Background drop down list option to Picture or Slideshow. Windows spotlight often displays nice pictures, but Microsoft displays text ads when this is selected.

Disable Windows Showcase to remove ads

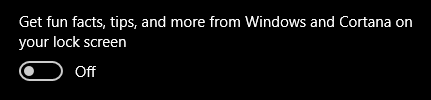
Set "Get fun facts, tips, and more from Windows and Cortana on your lock screen" to Off.

Disable fun facts in Windows 10

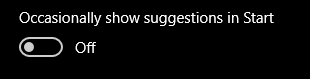
Part 2: Disable Start Menu Ads

Click on the Start Button, type in Start Settings and hit Enter.

Set "Occasionally show suggestions in Start" to Off.

Set Occasionally show suggestions in Start to Off

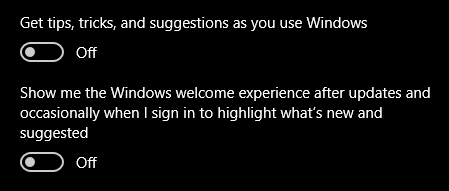
Part 3: Action Center Ads

Click on the Start Button, type in notifications & actions settings and hit Enter.

Turn off "Get tips, tricks, and suggestions as you use Windows" and "Show me the Windows welcome experience after updates and occasionally when I sign in to highlight what's change and suggested."

Disable action center ads

Part 4: Windows Ink Ads

Click on the Start Button, type in pen settings and hit Enter.

Turn off "Show recommended app suggestions."

Disable Windows Ink ads

Part 5: File Explorer Ads

Click on the Start Button, type in File Explorer Options  and hit Enter.

Click on the View tab.

Remove the check next to "Show sync provider notifications."
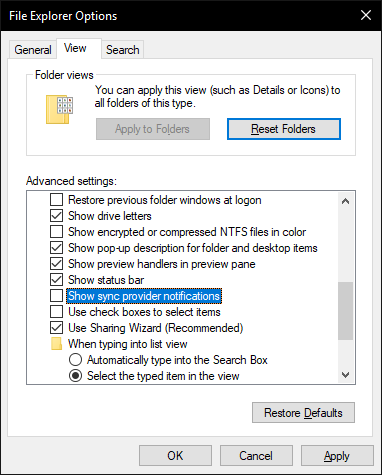
Disable File Explorer Ads

Click OK.

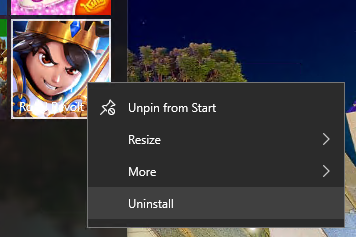
Part 6: Remove Preinstalled Apps

Windows 10 Creators Updates comes bundled with a number of apps from the Windows Store. To remove them, you can simply right click on the listing in the Start Menu, and then select Uninstall.

Remove preinstalled apps

Related Posts


I recently upgraded my home network from gigabit to 10G so I could take advantage of faster transfers between my Synology NAS, Proxmox server, and workstations. But while editing family video clips stored on my NAS, something did not feel right. Every device was connected at 10GbE, but file copy speeds were slower than expected. This made me wonder, are there bottlenecks in my network?

Read More

With remote work the new standard, having a fast and quality Internet connection and WiFi has become as important as reliable electricity. And if you work in IT support, confirming an end user's home internet, internal network, and WiFi is healthy without errors is the first step of troubleshooting any slowness or video conferencing issue with Zoom, Webex or Teams.

Read More

I've written about a few methods over the years to create a bootable USB flash drive from a Windows 10 ISO file.  But recently I switched to using a new tool called Rufus that is both reliable at successfully creating bootable media and automating many steps to quickly get the job done so you can perform a clean install.  This is very helpful when performing a clean install of the [Windows 10 20H2...

Read More

The latest update to Windows 10 known officially as the October 2020 update and 20H2 is ready for use and has begun rolling out.  The final build number of the 20H2 update is 19042 with minor revisions rolling out along with normal security updates via Windows Update. At this time the new build is available to testers before Microsoft pushes it to millions of users in the weeks ahead.  Check out the...

Read More